Linux KVM Bridge
By Sudheer S

Using Linux KVM, Expose Virtual Guests On The LAN
Audience: The blog post is for beginner to intermediary Linux system administrators.
- You should have a thorough understanding of the shell commands and
- be comfortable on the command line
- be able to install and configure packages, etc.
- be able to start and stop services using
systemd - be familiar with Linux configuration files
- be able to set Linux kernel parameters using
sysctl - be able to enable and disable Kernel modules
- be comfortable installing and using guest VMs using
libvirt
You should have a rudimentary understanding of networking concepts and tooling such as
- The OSI model.
- IP addresses and subnet masks.
- Routing.
- Firewall, iptables, ufw, Firewalld(firewall-cmd).
- HTTP, ARP, DNS, ping, dig, nslookup, etc.
- Familiarity with the
ipcommand is a must. - You should be familiar with
Netplanandnmcli.
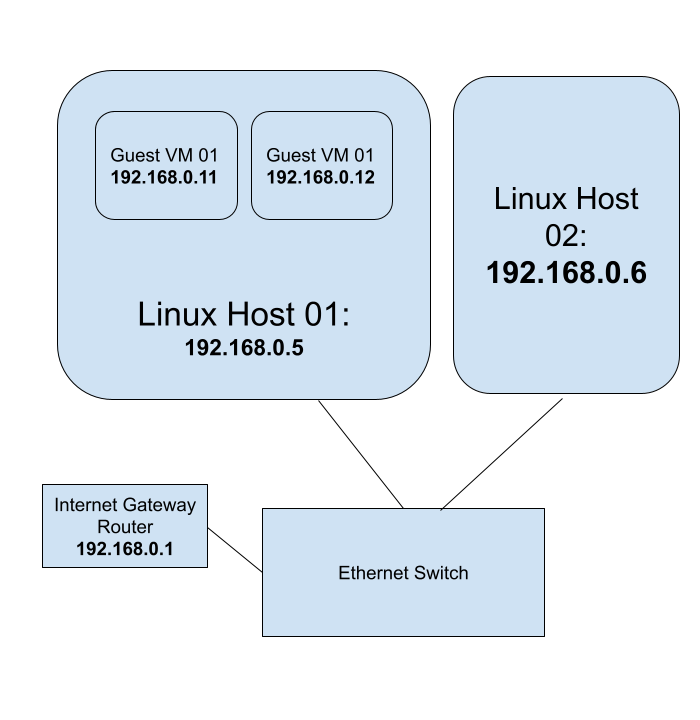
We will run web servers on the virtual guests and expose them to the LAN. Any device or computer on the LAN will be able to access the web servers running on the virtual machines.
We have the two host computers on the LAN(Local Area Network):
linux-host-01labelled Linux Host 01 having the IP address192.168.0.5. This host computer has the OS Ubuntu 22.04. The network interface is calledenp2s0.linux-host-02labelled Linux Host 02 having the IP address192.168.0.6. The OS on this computer could be anything.
On the LAN, we have a router and internet gateway having IP address 192.168.0.1.
Virtual Guests:
On Linux Host 01, we have two virtual guests:
guest-vm-01labelled Guest VM 01 having IP address192.168.0.11. The guest VM has the OS Ubuntu 22.04.guest-vm-02labelled Guest VM 02 having IP address192.168.0.12. The guest VM has the OS CentOS 9 Stream.
Prepare The Host Machine
Install The Linux Virtualization Packages
sudo apt install bridge-utils libvirt-clients libvirt-daemon-driver-qemu libvirt-daemon-system libvirt-daemon  qemu qemu-kvm  virt-manager
sudo systemctl start libvirtd
sudo systemctl enable libvirtd
bridge-utils: This package provides a set of command-line utilities for configuring and managing network bridges on Linux systems. Bridges are used to connect multiple network interfaces together into a single logical network segment.
libvirt-clients: This package provides command-line tools and libraries for interacting with the libvirt
virtualization API. It includes utilities for managing virtual machines, storage pools, and networks.
libvirt-daemon-driver-qemu: This package provides the QEMU driver for the libvirt daemon. The libvirt
daemon is a system service that manages virtualization resources and provides an API for managing virtual machines.
libvirt-daemon-system: This package provides the system-wide configuration files and service units for the
libvirt daemon.
libvirt-daemon: This package provides the libvirt daemon itself, which is responsible for managing
virtualization resources on the system.
qemu: QEMU is a generic and open source machine emulator and virtualizer. It provides hardware emulation for a wide range of architectures and devices, and can be used to run virtual machines on a host system.
qemu-kvm: This package provides a kernel module that allows QEMU to use the Kernel-based Virtual Machine (KVM) acceleration feature of modern Linux kernels. This provides faster and more efficient virtualization performance on hardware that supports it.
virt-manager: This is a graphical user interface for managing virtual machines using libvirt. It allows you to
create, configure, and launch virtual machines from a user-friendly interface.
Create The Bridge
A bridge operates on the data link layer (layer 2) of the OSI (Open Systems Interconnection) model. The data link layer is responsible for the reliable transfer of data between two nodes on the same physical network. Bridges operate by examining the data link layer address (MAC address) of each incoming packet and forwarding it to the appropriate destination based on the address. This allows bridges to connect multiple physical networks into a single logical network, providing a way for devices on different physical networks to communicate with each other as if they were on the same network.
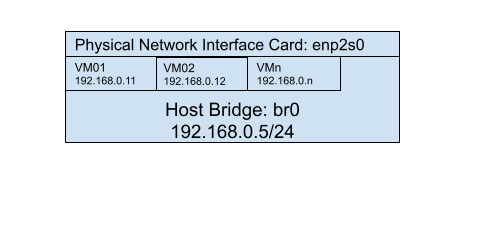
In our setup, we add the network interface enp2s0 to the bridge br0. Later, we will use the same bridge br0
to connect our virtual machines to the same bridge. That way, we share the physical network interface of the
host machine with the guests on layer 2.
Create the Netplan configuration file /etc/netplan/01-netcfg.yaml with the following contents:
network:
  version: 2
  renderer: NetworkManager
  ethernets:
    enp2s0:
      dhcp4: no
  bridges:
    br0:
      interfaces: [enp2s0]
      dhcp4: no
      addresses: [192.168.0.5/24]
      routes:
        - to: 0.0.0.0/0
          via: 192.168.0.1
      nameservers:
        addresses: [192.168.0.1. 8.8.8.8]
sudo netplan apply

This configuration file sets up a bridge interface named br0 that includes the enp2s0 interface. The bridge
interface is assigned the IP address 192.168.0.5, and it also specifies the gateway and DNS servers. The Linux
host 01 uses this bridge and IPV4 settings. The bridge uses a static IP address and configuration as opposed to DHCP.
A route to anywhere, ie 0.0.0.0/0 AKA default is defined on the bridge. All network destinations take this route
via the gateway 192.168.0.1.
Note that we are using NetworkManager as the rendered. It could as well be Networkd. Netplan operates on a
higher level and can manage both Networkd and NetworkManager.
Configure The Bridge To Bypass Netfilter Subsystem
Enable the br_netfilter kernel module:
cat <<EOF | sudo tee /etc/modules-load.d/br-netfilter-enable.conf
br_netfilter
EOF
sudo modprobe br_netfilter
Create the file /etc/sysctl.d/99-network-bridge.conf and the following contents:
net.bridge.bridge-nf-call-ip6tables = 0
net.bridge.bridge-nf-call-iptables = 0
net.bridge.bridge-nf-call-arptables = 0
Apply sysctl parameters without reboot
sudo sysctl --system
These lines are sysctl settings or kernel parameters that affect how the Linux kernel handles network packets when
they pass through a network bridge.
net.bridge.bridge-nf-call-ip6tables, net.bridge.bridge-nf-call-iptables,
and net.bridge.bridge-nf-call-arptables are options that control whether the kernel should pass the packet to the
corresponding Netfilter subsystem (in this case, iptables, ip6tables, and arptables) for further processing.
If set to 1, the kernel will pass the packet to the Netfilter subsystem. If set to 0, the kernel will not pass the
packet to the Netfilter subsystem.
Disabling these options can improve network performance by reducing the amount of processing overhead required by the kernel. However, it can also reduce the security of the system since these Netfilter subsystems provide important functions such as firewalling and packet filtering.
In the context of a virtualization setup like KVM, it is generally recommended to disable these options to improve
network performance. We disable this setting to also ensure that a firewall such as iptables/ufw on the host does
not matter. We simply bypass iptables as far as our bridge is concerned.
Create The Host Bridge
Create a host-bridge network in KVM using virsh. Create a new XML file named host-bridge.xml with the
following contents:
<network>
  <name>host-bridge</name>
  <forward mode="bridge"/>
  <bridge name="br0"/>
</network>
This will define a new network called host-bridge that uses bridged networking with the br0 bridge.
Define The New Network
sudo virsh net-define host-bridge.xml
The virsh net-define command is used to define a new virtual network on a libvirt-based virtualization host.
The host-bridge.xml part of the command refers to an XML file that contains the definition of the virtual network.
When you run the sudo virsh net-define host-bridge.xml command, you are instructing the virsh command-line
tool to read the host-bridge.xml file and create a new virtual network based on the definition contained within
the file.
Once the virtual network has been defined using the virsh net-define command, it can be started or stopped using
the virsh net-start and virsh net-stop commands, respectively. Additionally, you can use the virsh net-list
command to view a list of all virtual networks defined on the system, including the one you just defined
using virsh net-define.
Start The New Network
sudo virsh net-start host-bridge
Ensure The New Network Starts On Boot
sudo virsh net-autostart host-bridge
Now you have successfully created a new host-bridge network in KVM using virsh. You can use this network to
connect your guest VMs to the host network.
Create And Configure The Guest Virtual Machines
Prepare Ubuntu 22.04 Guest
Download ISO Image
sudo su
cd /var/lib/libvirt/images
wget https://releases.ubuntu.com/22.04.2/ubuntu-22.04.2-live-server-amd64.iso
The sudo su command is used to switch the current user to the root user in a Linux or Unix-like operating system.
This allows the user to execute commands with administrative privileges, such as installing software or modifying
system configurations.
The cd /var/lib/libvirt/images command changes the current working directory to /var/lib/libvirt/images.
This is the default location where virtual machine images are stored on a system that uses the libvirt
virtualization framework.
The wget command is a command-line utility used to download files from the internet. In this case, the command
is being used to download the Ubuntu 22.04.2 Live Server ISO image from the official Ubuntu release website.
The URL for the ISO image is https://releases.ubuntu.com/22.04.2/ubuntu-22.04.2-live-server-amd64.iso.
Install The Guest
qemu-img create -f qcow2 /var/lib/libvirt/images/ubuntu2204test.img 10G
virt-install \
--name guest-vm-01 \
--ram 1024 \
--vcpus 1 \
--location /var/lib/libvirt/images/ubuntu-22.04.2-live-server-amd64.iso,kernel=casper/vmlinuz,initrd=casper/initrd \
--disk path=/var/lib/libvirt/images/ubuntu2204test.qcow2,format=qcow2,bus=virtio \
--network network=host-bridge \
--graphics none \
--noautoconsole \
--os-variant ubuntu22.04 \
--extra-args='console=ttyS0,115200n8 --- console=ttyS0,115200n8'
The qemu-img command is used to create, convert, and modify disk images used by QEMU-based virtualization tools.
The create subcommand is used to create a new disk image file, while the -f option is used to specify the format
of the disk image.
In this case, the command qemu-img create -f qcow2 /var/lib/libvirt/images/centos9streamtest.img 10G is creating a
new disk image file in the qcow2 format at the path /var/lib/libvirt/images/centos9streamtest.img with a size of
10 gigabytes.
The qcow2 format is a popular disk image format used by virtualization tools like QEMU and KVM. It supports features
like snapshots and encryption, and provides a more efficient use of disk space than other formats like raw disk images.
After the disk image has been created, it can be used as the storage device for a new virtual machine using a tool
like virt-manager. The virtual machine can then be configured to use the disk image as its primary storage device,
allowing the guest operating system to be installed and run within the virtual machine.
Once the guest is created, open it in Virtual Machine Manager. Open a terminal in the guest. Configure its networking.
Create the file /etc/netplan/mynet.yaml with the following contents:
network:
  version: 2
  renderer: networkd
  ethernets:
    ens3:
      dhcp4: no
      addresses: [192.168.0.11/24]
      routes:
        - to: 0.0.0.0/0
          via: 192.168.0.1
      nameservers:
        addresses: [192.168.0.1, 8.8.8.8]
Prepare CentOS 9 Stream Guest
Download ISO Image
sudo su
cd /var/lib/libvirt/images
wget 'https://mirrors.centos.org/mirrorlist?path=/9-stream/BaseOS/x86_64/iso/CentOS-Stream-9-latest-x86_64-dvd1.iso&redirect=1&protocol=https' -O CentOS-Stream-x86_64-9-20211212-dvd1.iso
Install The Guest
qemu-img create -f qcow2 /var/lib/libvirt/images/centos9streamtest.img 10G
virt-install \
--name guest-vm-02 \
--ram 1024 \
--vcpus 1 \
--location /var/lib/libvirt/images/CentOS-Stream-x86_64-9-20211212-dvd1.iso \
--disk path=/var/lib/libvirt/images/centos9streamtest.qcow2,format=qcow2,bus=virtio \
--network network=host-bridge \
--graphics none \
--noautoconsole \
--os-variant centos \
--extra-args='console=ttyS0,115200n8 --- console=ttyS0,115200n8'
Once the guest is created, open it in Virtual Machine Manager. Open a terminal in the guest. Configure its networking.
Run the following command to show the available network interfaces:
nmcli device status
Identify the name of the interface you want to configure. In this example, we will use the name ens3.
ip link show
Run the following command to set the interface to use the host bridge:
sudo nmcli connection modify ens3 ipv4.addresses 192.168.0.12/24
sudo nmcli connection modify ens3 ipv4.gateway 192.168.0.1
sudo nmcli connection modify ens3 ipv4.method manual
sudo nmcli connection modify ens3 ipv4.dns "192.168.0.1, 8.8.8.8"
sudo nmcli connection modify ens3 connection.autoconnect yes
sudo nmcli connection up ens3
Restart the networking service:
sudo systemctl restart NetworkManager.service
Testing
- Install Apache web server on both the guests. Put up some unique web pages.
- Access the web servers from host machine 02 via curl:
curl http://192.168.0.11
curl http://192.168.0.12
The networking should also allow connections from host to guest. On Linux host 01, try the same curl command as above. You should see a proper HTTP response.
Guest Network Test
Launch the terminal on the guest and perform some networking checks:
Resolve DNS on the guest:
dig google.com
Reach the Internet
ping google.com
References
- Linux Virtualization
- sysctl
- Automating Virtual Machine Installation Using libvirt, virsh and cloud-init