Below you will find pages that utilize the taxonomy term “Network”
DevOps Lab: Run Your Own VPN Server
There are many applications and technologies enabled by VPN. We will focus on one of them in this post: client VPN.
Connecting To A Private Network
If the server you are trying to access is on a private network, you can use a VPN to connect to the network as if you were physically present on the same network. This can be useful if you need to access resources or devices that are only available on the private network.
DevOps Lab: Run Your Own Email Server
To run your own email server using Linux and other open source software, you’ll need to first choose a Linux distribution and install it on your server. I’d go with either Ubuntu, Debian or Rocky Linux. Once you’ve done that, you can choose an email server software that is compatible with Linux, such as Postfix or Exim. After installing and configuring the email server software, you’ll need to set up DNS records and configure authentication and encryption to ensure that your email server is secure. Finally, you’ll need to test your email server to make sure it is working properly and can send and receive messages.
DevOps Lab: Run Your Own Load Balancer
Definition
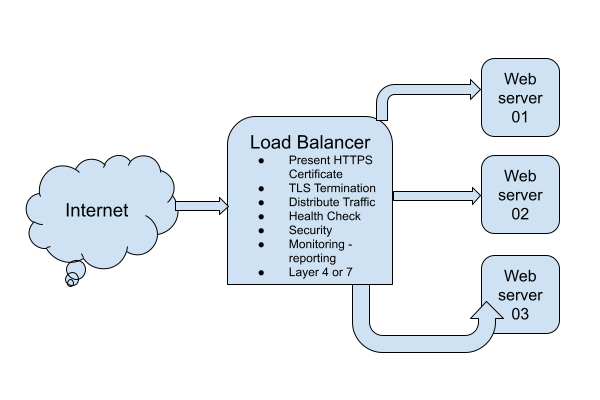
A load balancer is a type of software or hardware that distributes incoming traffic across multiple servers or resources. This allows the load balancer to distribute the workload evenly, improving the performance and availability of the application.
The Load Balancer Lab
To run your own load balancer using open source software, you will need to:
- Install and configure the load balancer software on a server. Some popular open source options include HAProxy, Nginx, and Envoy.
- Configure the load balancer to distribute incoming traffic to the appropriate servers or resources. This typically involves setting up virtual servers and defining rules for routing traffic.
- Test the load balancer to ensure that it is working correctly and distributing traffic as expected.
- Monitor the load balancer and the underlying servers to ensure that the system is performing well and handling traffic effectively.
- Continually tune and optimize the load balancer configuration to improve performance and ensure that the application is always available and responsive.

DevOps Lab: Run Your Own Web Server
Once upon a time, Apache was the de-facto web server solution. Later, Nginx became popular. If you are getting started with DevOps and Linux system administration, I would recommend you to start with Nginx.
Start With A Static Website
What is a static website? A website made from HTML and CSS. And maybe some JavaScript, images, videos, fonts, etc. The
key takeaway is that there is no server side application involved. Install the Nginx web server on your Linux VM.
Configure it to serve a static website. You will need a static website as a per-requisite. Create a static website by
assembling some HTML, CSS, JavaScript and images. Optionally, add some fonts and videos. Access the website from your
web browser by typing the IP address of the web server in the address bar. Take it to the next level by pointing
the DNS A record of your domain to the VM. For our purposes, a fake domain or a local unregistered domain is
sufficient. Manipulating /etc/hosts is also fine. Enjoy viewing the website from the browser.
DevOps Lab: Run Your Own DNS Server
As soon as you are ready to deploy services and applications on the Internet, the first thing you need is a registered domain and a DNS server. Often people just use the DNS service provided by the domain registrar or the hosting or cloud provider. Using the managed service is not a requirement. You can host your own DNS server and manage the DNS for your domains. There are many open source software using which you can build your own DNS servers. Bind is the traditional and probably the most popular DNS solution out there. There are other options such as Knot, PowerDNS and Unbound.
Run Your Own OpenVPN Server
Introduction
The article explains how to run your own OpenVPN server. We will create a Certificate Authority Server and an OpenVPN server. We will also generate certificates for the clients. We will also learn how to manage revocation of client certificates using the Ansible roles.
Use the Ansible roles gavika.openvpn and gavika.easy_rsa to install and configure your OpenVPN server.
You can install the OpenVPN server on any public cloud or hosting provider or on-premise servers. The Ansible roles
are designed to install the OpenVPN server and a Certificate Authority server.
How To Determine Your Public IP Address Programmatically From An Ansible Task
Short answer: use ipify
ipify provides a simple public address API.
Using the tool, you can determine your public IP address programmatically. If you are using the shell:
curl 'https://api.ipify.org'
Using it in a shell script:
my_ip=$(curl 'https://api.ipify.org' -s)
echo $my_ip
Using the Ansible ipify module:
- hosts: localhost
  vars:
  tasks:
    - name: Get my public IP
      ipify_facts:
        timeout: 20
      delegate_to: localhost
      register: public_ip
    - name: output
      debug: msg="{{ ipify_public_ip }}"
Sample output of Ansible playbook execution:
ansible-playbook ipify.yml
 [WARNING]: provided hosts list is empty, only localhost is available. Note that the implicit localhost does not match 'all'


PLAY [localhost] **************************************************************************************************************************************************************************************************

TASK [Gathering Facts] ********************************************************************************************************************************************************************************************
ok: [localhost]

TASK [Get my public IP] *******************************************************************************************************************************************************************************************
ok: [localhost -> localhost]

TASK [output] *****************************************************************************************************************************************************************************************************
ok: [localhost] => {
    "msg": "49.206.13.205"
}

PLAY RECAP ********************************************************************************************************************************************************************************************************
localhost                  : ok=3    changed=0    unreachable=0    failed=0